

Tone Production Part 2 General Aspects – Principles – Procedures
By Isolde Schaupp
Nail filing may be approached using the following steps as a guide line:
Share this:
[feather_share]
STEP 1
Finding the Contact and Release Points of a, m, i. hold the guitar in your normal playing position and fold a piece of sandpaper (600) around the upper strings. Hold the paper at both ends with the left hand in such a way that it sits firmly against the first string (fig. 1). Maintaining your chosen right hand playing position, execute at least 100 strong tirando strokes with each fingernail (a, m, i) on the sandpaper-covered first string. A straight line will eventually appear in the shape of each nail as a result of the filing. Size and position of this line will vary from finger to finger. The line indicates which section of the nail functions as the bottom part of the ramp and also shows approximately where the release point (R) is situated (see fig. 2).

The contact point can be found quite simply by observing each finger at the beginning of the stroke. It is usually located lower than the beginning of the described line (the line marks only the last part of the ramp where the pressure on the nail is, and thus also the filing effect is strongest).
The release point is therefore found through the use of sandpaper, or as Koch 1. recommends it:
Execute a stroke extremely slowly on the first string until the release point is reached. With the help of a little mirror it can be seen and marked with a pencil. Alternatively you may require the assistance of a 2nd person.
STEP 2
Profiling a, m and i
A fine steel file covered with diamond particles, or sandpaper (600) may be used to shape the profiles.
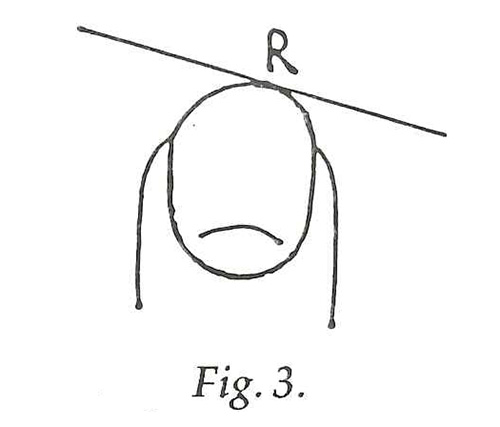
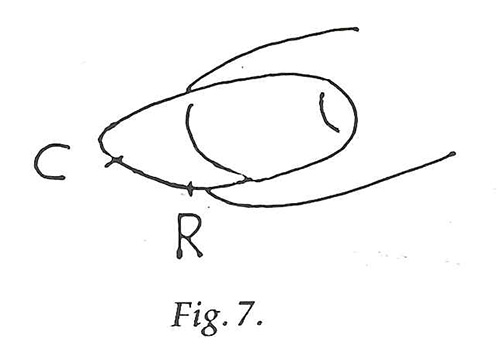
Imagine the string now as a tangent to the nail at the release point (taking into account the actual angle(s) of attack) and file a flat curve around either side of the release point (fig. 3). Koch recommends filing symmetrical curves on both sides 2 and this does indeed work very well in many cases. However, one can easily take off too much from the right side. It is therefore safer to file away a little at a time and to continue the process gradually, letting it depend on the acoustic result.
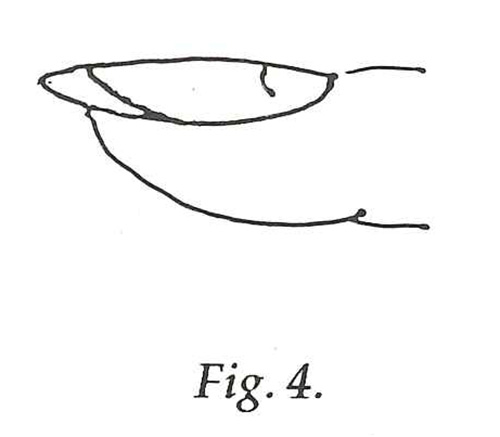
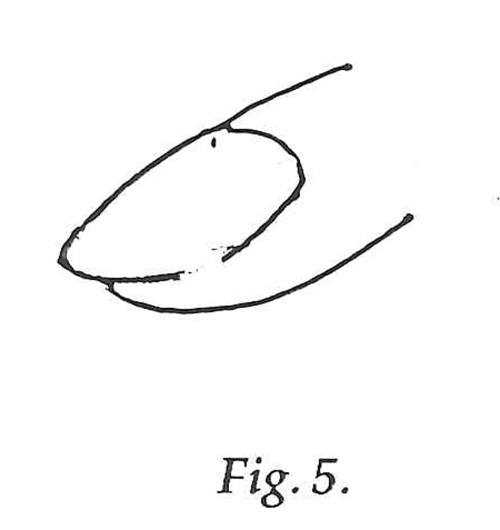
Complete the ramp now in a well rounded curve on the left side towards the contact point. From a side view the ramp should look straight and even (fig. 4), see also half profile (fig. 5) 3.
Before checking how a nail sounds it should always be finished and polished as described in Step 3 below, because a safe judgement is not possible otherwise.
A nail may be considered as “working” satisfactorily if the string glides smoothly and if its tone has a certain roundness and fullness (a matter of personal judgement). Ideally it should have both body and brilliance (see my article Tone Production Part I). If there is not enough body (which is the most common) the shape around the release point should be adjusted by flattening the round (which of course will make the nail shorter – one should take this into account before one begins to profile). If the tone is lacking brilliance a very tiny adjustment in the opposite direction (making the round steeper towards the release point) will usually make the difference. A nail should “work” in both tirando and apoyando. As it is more difficult to achieve a good tirando tone one should first adjust the nail to the tirando stroke; a good apoyando should then result as well.
For obvious reasons one should aim for the best possible balance in tone between the a, m and i fingers.
As a general tendency the a fingernail should be left slightly longer than the m fingernail and the m fingernail slightly longer than the i fingernail, in order to adjust for the different length of the fingers and their different curvature, particularly in chord playing.
STEP 3
Finishing and Polishing
Gently remove with sandpaper (600-700), any unevenness underneath and around the edge of each nail along its profile.
Now profile the edge with finger sandpaper (1,200) by filing away the sharp edge of the nail at it’s underside.
The thinner the nail, the less and the more cautiously it should be filed, in order not to thin the edge out too much.
On the other hand, with thick nails an intentional thinning of the edge particularly around the release point improves the flexibility of the nail and avoids a release which is too abrupt.
Polish now with even finer sandpaper (if not available, with heavily used 1,200 paper) underneath and around the edge along the profile. Some players put Vaseline on the sandpaper before polishing 4. Alternatively, a piece of leather wrapped around the nail file may serve the same purpose equally well.
STEP 4
Shaping the thumb nail In general, the thumb nail needs to be considerably longer than the other fingernails (about twice as long on average).
The ramp of the thumb nail functions in the reverse direction to the other fingers. The nail contacts the string somewhere around the middle, at its top edge, and releases it somewhere further down its left edge, depending on how high the wrist is set.
The more diagonal the hand position, the longer the thumb nail usually needs to be The more inwardly the hand is turned in its longitudinal axis, the flatter, the ramp needs to be filed, while the more outward the turn, the more nail is obviously needed at the playing side These are simple general tendencies. In any case, there must be enough nail resistance before the release of the string although, of course, the nail must not catch. It is advisable to leave more nail on the left side at first when shaping is begun and to gradually take more away until a satisfactory result is reached.
As with the other fingers, the curve around the release point is of special importance for the tone. A flat curve will give the tone more body while a steeper curve will add brilliance. A flat curve may be tried out at first, as it can easily be made steeper, if required. As with the other fingers, the slope of the nail should become slightly steeper towards the contact point. It must also be continued past the release point before the nail is rounded off towards the other side to avoid any catching of the nail if the thumb is brought further back. This may happen accidentally or may be done intentionally, i.e. in order to change the angle of attack for special effects. The result is that the contact point is moved further to the right side.
If the thumb tone is accompanied by too much noise (particularly on the bass strings) after it has been properly finished and polished, one should try to play with less nail (with a shorter ramp) and with a more sudden attack. As an alternative one can change the direction of the attack slightly.
Also, it should be realised that some bass strings are more noisy than others, depending on how they are wound. The more the direction of attack resembles the direction of how the bass strings are wound, the less “scratching” will accompany the tone (Fig. 5).
During the whole process of shaping the fingernails, it usually turns out that minor (or maybe even major) adjustments regarding the hand position are still necessary. In fact, despite all the principles and procedures regarding right hand tone production mentioned above (see also my previous article) a trial and error component frequently remains for every player who searches for his/her optimal individual tone. This component can be quite considerable in some cases.
One should also always take into account that weak nails will generally produce a softer and thinner tone than stronger nails, even if the hand position and shaping are optimal.
Softer or splitting nails can sometimes be treated with very good results. Some internal treatments include Gel Caps, the regular intake of Alfalfa sprout, and plenty of milk over several weeks or even months. Both conditions can be improved by the treatments above.
Some external treatments, which can also be quite effective, include nail hardeners and calcium builders.
Artificial reinforcement with, for instance, nail polish-like liquids is also possible. But one should be careful not to reinforce the part around the release point too much as a certain flexibility of the nail is desirable there as already mentioned.
False nails are the “last resort” in case of disaster only, if one does not want to play with flesh. Specialist nail shops provide professional advice.
In any case, permanent nail care is essential in terms of maintaining the same shape and condition needed for playing all the time. This is a matter of only a few minutes each day, if done continuously. It is necessary to firstly develop the tone, and later to avoid its deterioration.
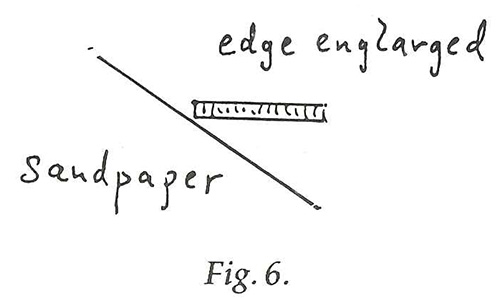
Finally, after the tone has been “found” in principle, it requires some patient and dedicated (i.e. slow) practice with a “prepared attack,” i.e. the finger is to be positioned correctly on the string before the stroke is executed. (Fig. 6) This is the fastest method of gaining secure control of the specific touch connected with a good tone. This also applies to variations in the angle of attack, in order to produce different tone colours.
As in all aspects of playing, permanent aural control naturally plays an essential part in achieving and maintaining a good tone.
- Michael Koch, Tonbildung Klangformung, Ueben und Musizieren, Heft 4. Mainz: B. Schott’s Soehne, 1987, p.309.
- Michael Koch. op. cit. p.310
- Charles Duncan, The Art of Classical Guitar Playing, Ed. Princeton, New Jersey: Summy-Bir- chard Music, 1980, p.51.
- Charles Duncan. op. cit. p.58
- Karl Sandvoss, Konstruktive Regeln zum Bau intonationssicherer Gitarren und das Saitenproblem, Gitarre und Laute 61,1984.
- Charles Duncan op. cit. p. 48
